Find and Manage Warranty Jobs

Warranty Jobs are used to group warranty requests for a specific property or unit. Each Warranty Job is linked to a Job in the system, which represents the property address (building and unit). This allows all warranty requests for a property to be organized and managed in one place.
A Warranty Job is required before creating a new warranty request.
- If a matching Warranty Job already exists, it can be selected.
- If not, a new Warranty Job must be created before the request can be completed.
Warranty Jobs are created by linking them to an existing Job in the BuildBase system. Jobs are typically created through the Project Management module when properties are constructed.
Navigate to the Warranty Job List
- Open the appropriate dashboard.
- Select Create Warranty Request. This opens the Warranty Job list, where Warranty Jobs can be found, created, and managed.
Finding a Warranty Job
- Searches can be performed using the Warranty Job code, civic address, or key information, and will return results based on partial matches.
- Filters can also be applied using the Filter button to the right of the search bar. Users can filter by either Job Status or Job Type.
Work with Warranty Jobs
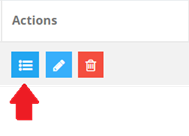
The Warranty Job list is the central place for working with Warranty Jobs. Once a Warranty Job has been located, use the Actions column to take the appropriate next step.
View Requests
From the Warranty Job list, select View Requests to open the Warranty Job Requests page.
This page allows users to:
- View all warranty requests linked to the job
- Create new warranty requests
- Manage existing requests, including deficiencies and work orders
For detailed instructions on managing warranty requests, including deficiencies and work orders, see Managing Warranty Requests.
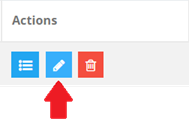
Edit a Warranty Job
From the Warranty Job list, select Edit to open the Edit Warranty Job page.
This page allows users to:
- Update Warranty Job details
- Manage the Warranty Job Person List
- View and add warranty requests linked to the job
For more information on updating Warranty Job details and fields, see Edit a Warranty Job below.
Delete a Warranty Job
From the Warranty Job list, select Delete to remove a Warranty Job.
If you are unsure, contact your administrator before proceeding.
Some actions may be limited based on user permissions.
Create a Warranty Job
A new Warranty Job can be created from the Warranty Job list.
- From the Warranty Job List select Create New.

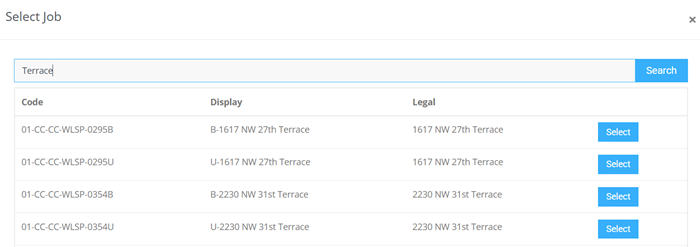
- On the New Warranty Job page, select the search icon to open the Job search window.

- Search for the correct Job. Jobs represent property addresses (building and unit) in BuildBase and are created in the Project Management Module.

- Select the Job from the results. The job code and civic address will populate automatically when the job is saved, and the Warranty Job status will default to Open.
- Enter the required Warranty Job details, including job type and other relevant information.
- Select Save. A confirmation message will appear in the top right corner of the browser if the save is successful.
If the job cannot be saved, confirm all required fields are completed. If the issue persists, contact your administrator.
If a Job Cannot Be Found
If a Job cannot be found:
- Confirm that the address provided is correct
- Contact the requester for clarification if needed
Warranty Jobs can only be created for Jobs that already exist in the system, and only one Warranty Job can exist per Job.
If a Job cannot be found, it may not yet exist in the system or may already be linked to an existing Warranty Job. Check the Warranty Job list or contact an administrator if needed.
Edit a Warranty Job
The Edit Warranty Job page allows users to update job details and manage associated information for the selected Warranty Job.
The following sections and functions are available within Edit Warranty Job page:
Section / Field | Description |
Job Details | Update core information about the Warranty Job, including job type and other relevant details. |
Address | Auto populates with the civic address associated with the Job code assigned. |
Status | Indicates the current status of the Warranty Job. |
Job Type | Choose from Project, Building, Unit or other. |
Key Information | A searchable freeform text field that users can enter information relevant to the job for information and searchability. |
Possession Date | Auto populates with the possession date contained within the Job details. |
Warranty Start Date | Populate from the warranty agreement details. |
Warranty End Date | Populate from the warranty agreement details. |
Comment | User comments for internal use only. |
Warranty Job Person List | Lists people associated with the Warranty Job and allows updates to contact or involvement details. |
Warranty Request List | Displays all warranty requests linked to the job. Includes functionality to access the Warranty Request Details and to quick create new warranty requests. |
Warranty Job Person List
The Warranty Job Person List is used to track individuals associated with the Warranty Job, such as homeowners, contractors, or other relevant contacts.
Users can assign existing people to a Warranty Job or add new individuals if they do not already exist in BuildBase.
Assign a Person to a Warranty Job
- From the Edit Warranty Job page, select Assign Person to open the Search & Assign Person window.

- All available people will be listed in alphabetical order. If the list is long, users can use the search bar to find a person who is already listed in BuildBase. Searches can be performed using partial information.
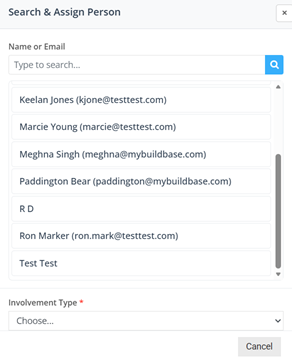
- Locate and select the correct person in the search results. If the results found no matches, you will have to move to adding a person which is explained below.
- Select the appropriate Involvement Type. The Involvement Type identifies the person’s role in the Warranty Job (for example, homeowner, contractor, or tenant).
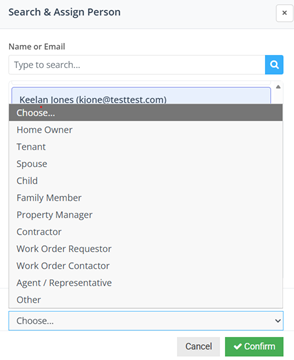
- Select Confirm to assign the person to the Warranty Job.
Add a Person to a Warranty Job
If the person cannot be found in by searching, close the Search & Assign Person window and select Add Person to create a new record.

The following sections and functions are available within Warranty Job Person Details window:
Field | Description |
First Name (required) | First name of the person |
Last Name (required) | Last name of the person |
Phone | Primary phone number |
Alternate Phone | Secondary phone number |
Primary email address | |
Alternate Email | Secondary email address |
Preferred Contact Method (required) | How the individual prefers to be contacted. Options include; Email, Phone, Text, and Other. |
Notes | Additional information or context for the individual |
Address Details | This is an expandable section that contains fields for the person's preferred address. |
Involvement Type (required) | Identifies the person’s role in the Warranty Job (for example, homeowner, contractor, or tenant). |
Comment | Alongside the Involvement Type to capture additional details about the individual’s role or involvement. |
Once all relevant information is completed about the person, select the save button to save the person into BuildBase and assign them to the current Warranty Job.
Warranty Request List (from Edit Warranty Job page)
The Edit Warranty Job page includes a Warranty Requests section that allows users to view existing requests and create new ones directly from the job.
View Warranty Requests
This section displays all warranty requests associated with the Warranty Job.
Select View All Requests to open the Warranty Job Requests page, where the full list of requests can be reviewed and managed.
Add a Warranty Request
Select Add Request to open the Warranty Request Details window. Enter the required request information; Priority (required), Requested By, Requested Date, Request Details (required).
For detailed instructions on creating warranty requests and managing existing requests, including deficiencies and work orders, see Creating Warranty Requests and Managing Warranty Requests.