Sales Model Template Configuration

This guide will walk you through the steps required to set up Base Templates, Project Templates inside BuildBase.
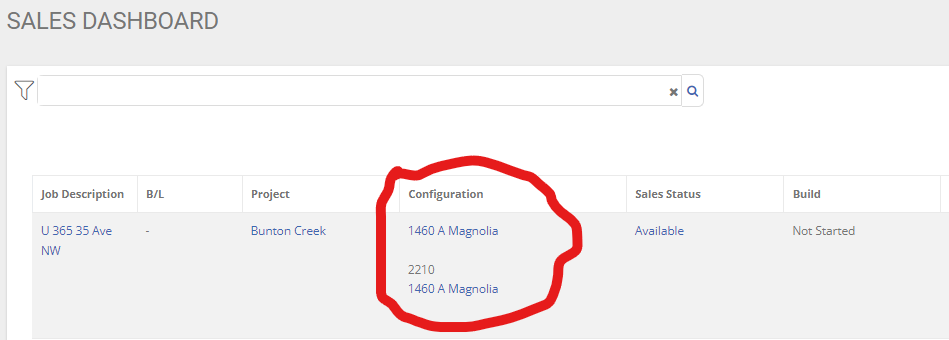
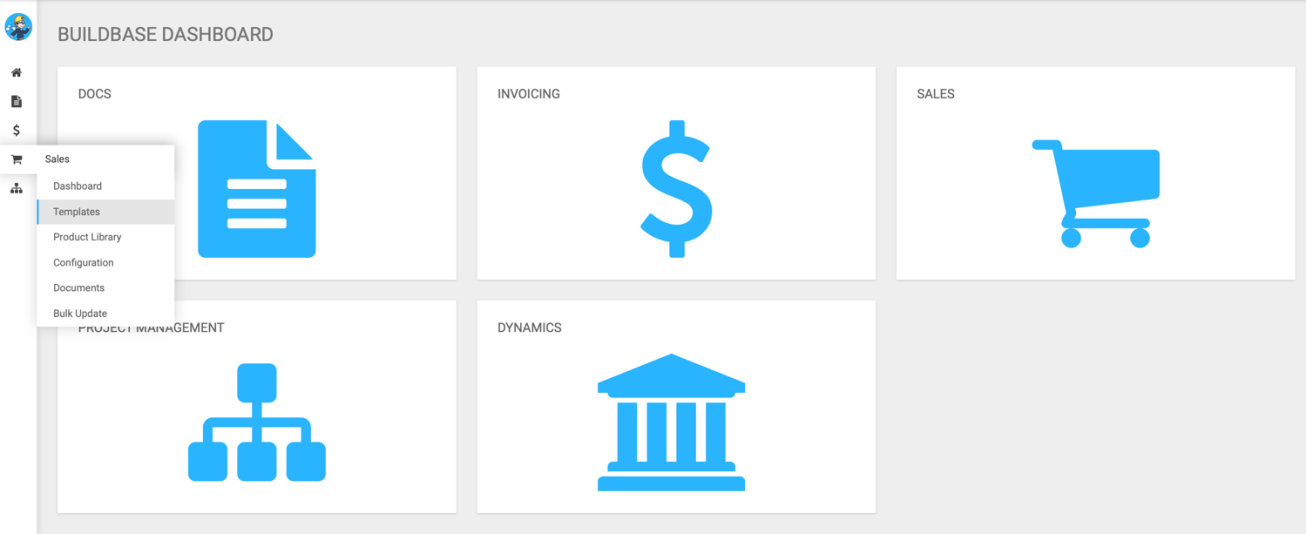
STEP 1 - Navigate to the ‘Templates’ section within the Sales Module.
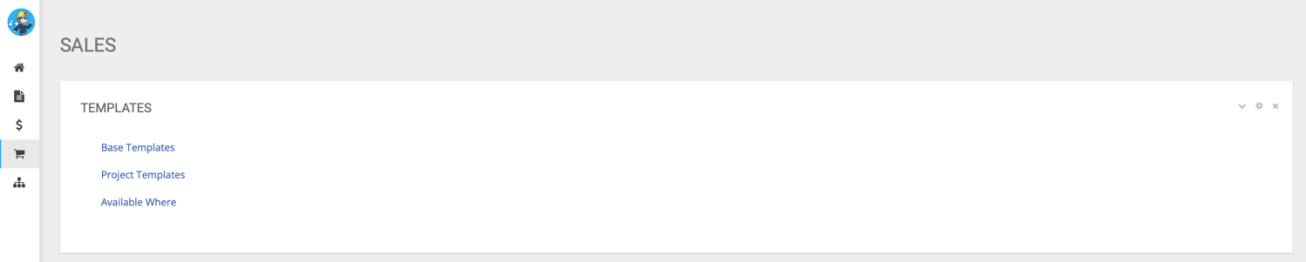
From here, you will be sent to a page with three different options – Base Templates, Project Templates and Available Where. For the purpose of this, we don’t need to worry about the Available Where section – that just shows us a Project Job List. We are concerned with Base Templates & Project Templates.
An example of Base Templates and Project templates could be: There is standardized unit model – this will be configured as a base template, however this is offered in multiple projects and there could exist slight differences that we want to reflect, so we will create individual project level templates for each of the sub-areas that this unit model exists within.
A rough guide on how the steps look for creating new templates is:
- Is this a new community?
- If so, we need to create the new community/area and following sub-areas. This will be shown later in the document.
- If not, do the required templates exist within the community? If not, proceed to creating templates.
- Retrieve the specific building model code and naming schema from Procurement or production Department. These must be matched to what has been created inside Dynamics.
- Retrieve any unit level model codes and naming schema that exist within the building shell.
- If it is a single-family model, there will only be a building level template code and name, which apply as ‘Both.’ (Shown in later steps)
- Create Building Level Base Template.
- Create Building Level Project Template.
- Create Unit Level Base Template (if applicable).
- Create Unit Level Project Template (if applicable).
- Assign required building and unit level templates to the created sub-area that these will exist within.
The remainder of this document will use the following two examples:
- A new multi-family duplex needs to be created in Edmonton.
- A new single-family model needs to be created in Edmonton.
STEP 2 - Creating a Base Template
Navigate to the Base Template section within the Templates section in the Sales Module.
We will need to create new Base Templates by selecting the create a new one toggle.

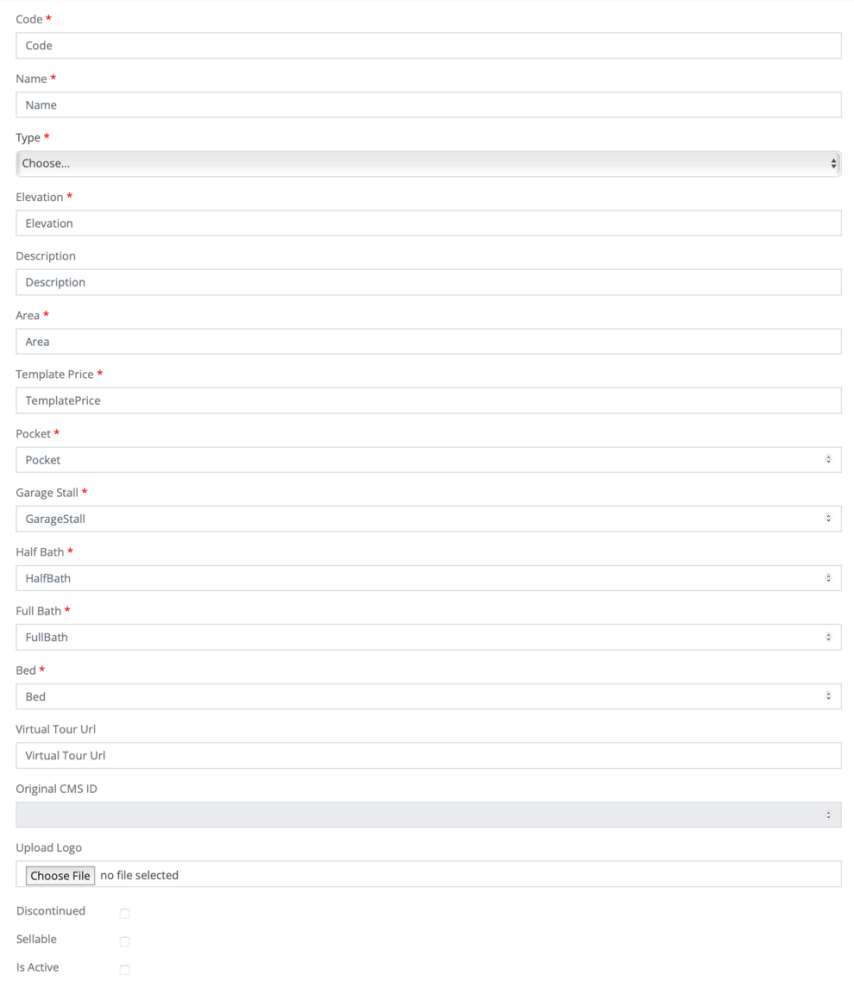
We will be prompted to fill out the following information:
- Code: Find from procurement or production
- Name: This is the specific naming schema from procurement or production.
- Type: The type of template.
- You will use Building, Unit or Both.
- Building: This is the template for a MF Shell
- Unit: This is the template for the unit inside the MF shell
- Both: This is the template for a SF unit.
- Elevation: The elevation, if applicable.
- Could be A,B, B1, C etc. for SF.
- For MF unit template – enter ‘UN’.
- Description: This should be the name.
- Area: The square footage of the building, or unit. Can find this on the construction base drawings.
- Template Price: .
- Pocket: The pocket size applicable.
- Garage stall: How many garage stalls? Enter the integer value.
- Half Bath: How many half baths? Enter the integer value.
- Full Bath: How many full baths? Enter the integer value.
- Bed: How many bedrooms? Enter the integer value.
- Virtual Tour URL: If you / marketing has a virtual tour URL for the template, this is where it gets entered.
- Discontinued checkbox: Leave unchecked
- Sellable checkbox: Mark as checked if you want to sell this template.
- Is Active Checkbox: Mark as check if you want this template to be active and applicable.
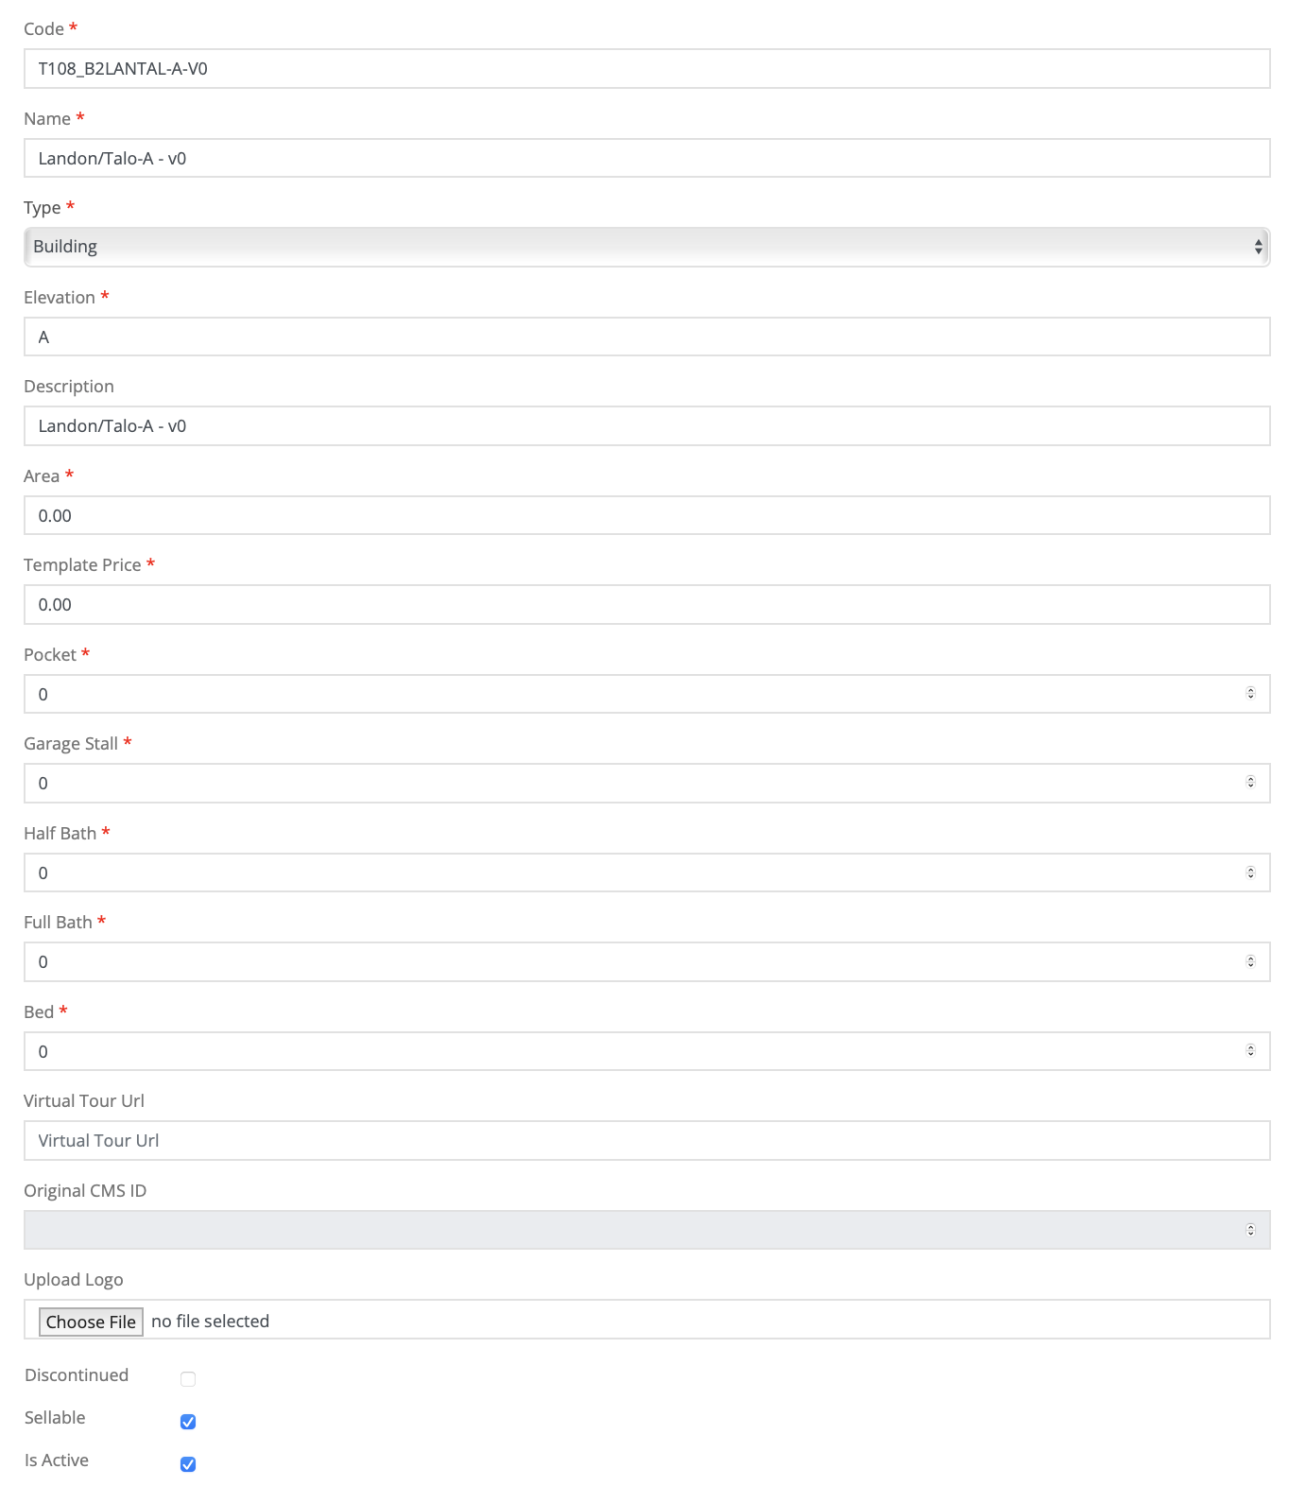
A filled version will look like the following (a MF shell example):
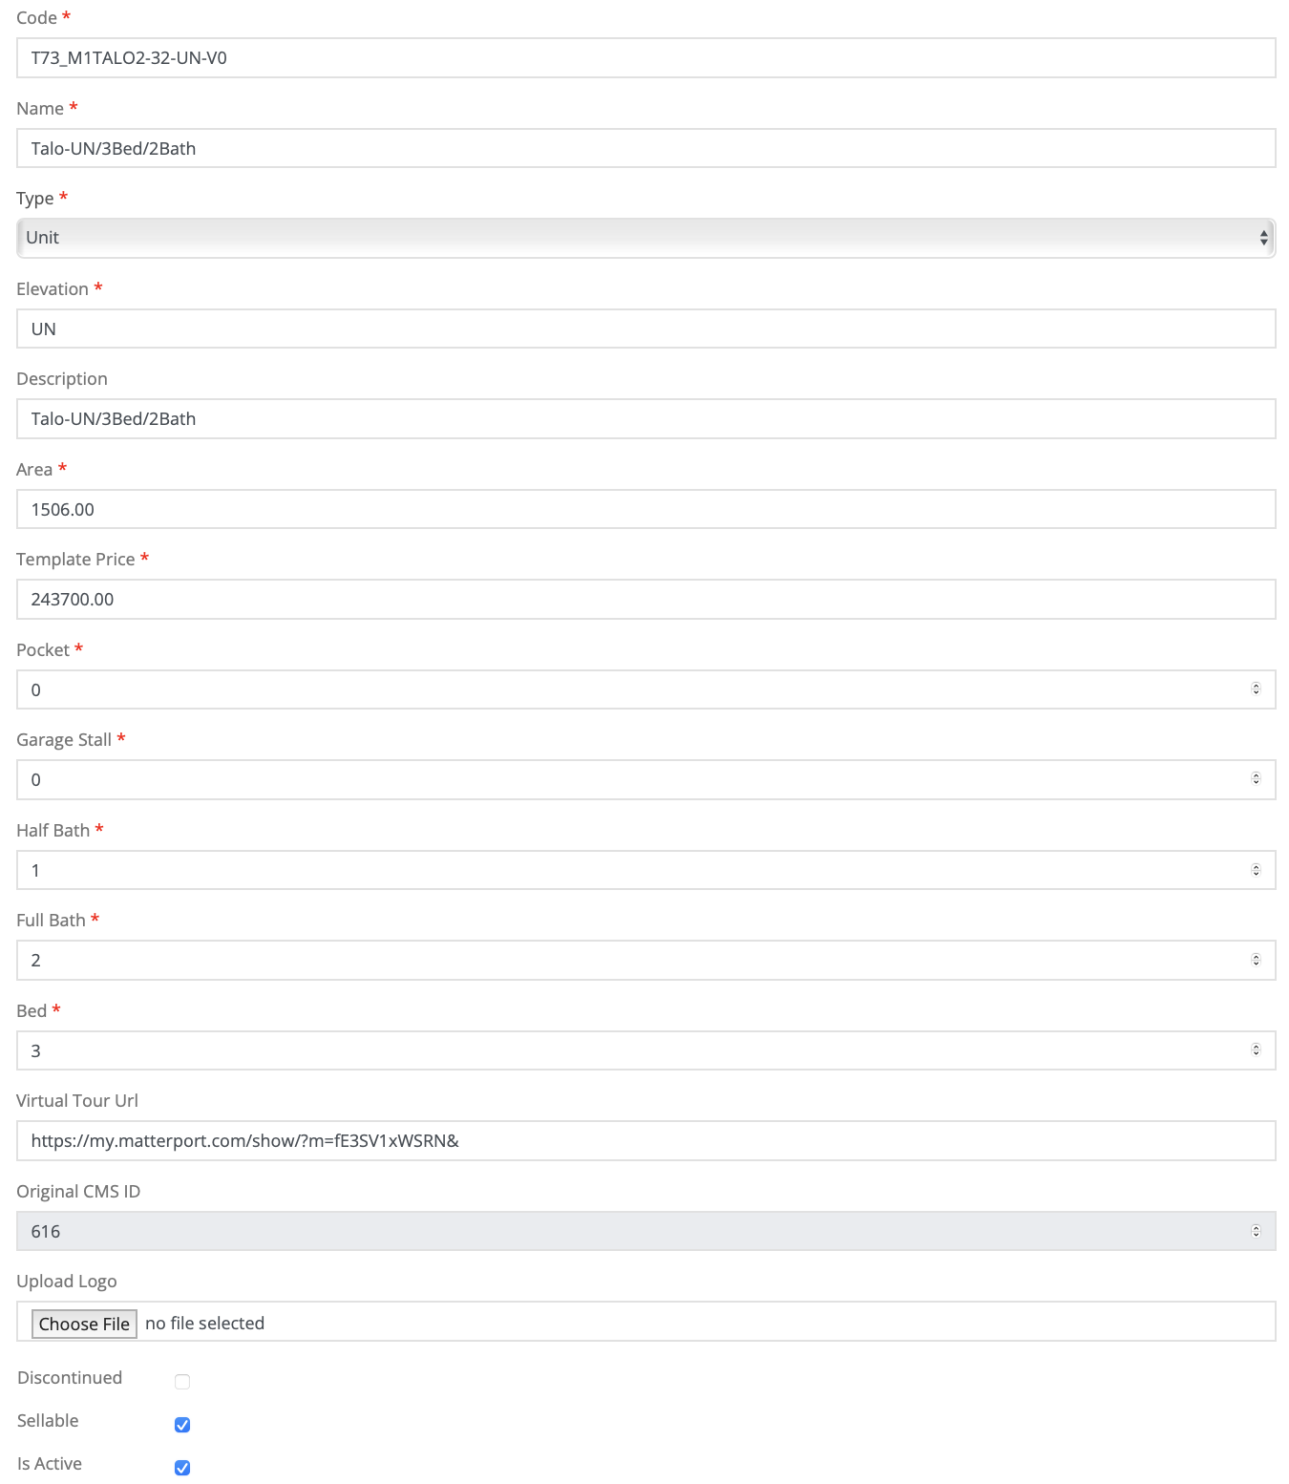
A filled version will look like the following (a MF Unit example):
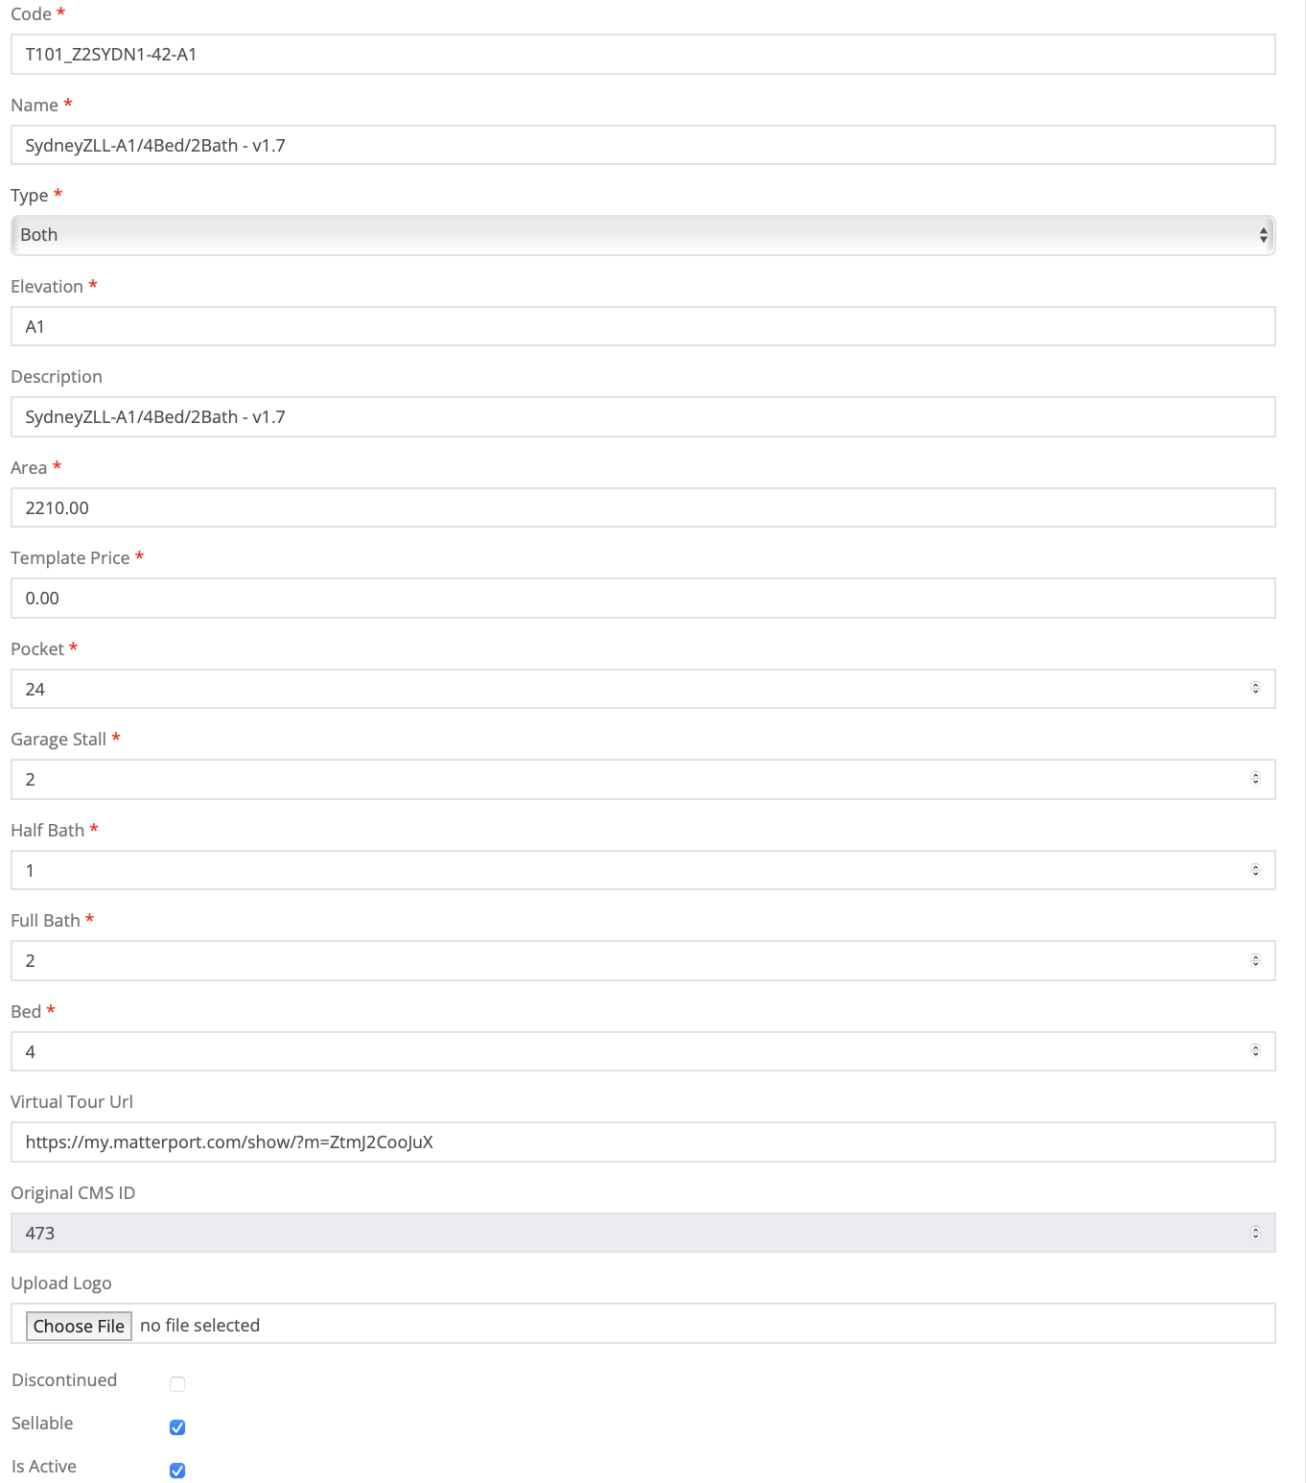
A filled version will look like the following (a SF example):
Failed to save template Issue
A common error that you may receive when trying to save the template to the sub-area level after creation is the following:
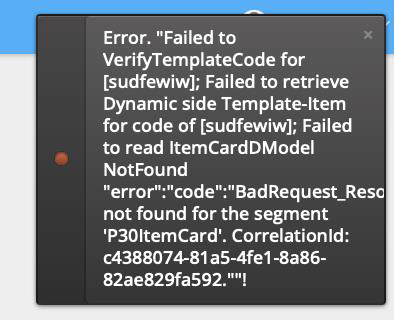
This indicates that you have mis-entered or is-received the naming schema and/or code for the Base Template. Please verify that both of these are correct – and the issue will resolve. Once we have the Base Template created, we now need to start populating the template:
We need to:
I. Update the Template List
II. Update the Template Image List
III. Update the Base Template Style List
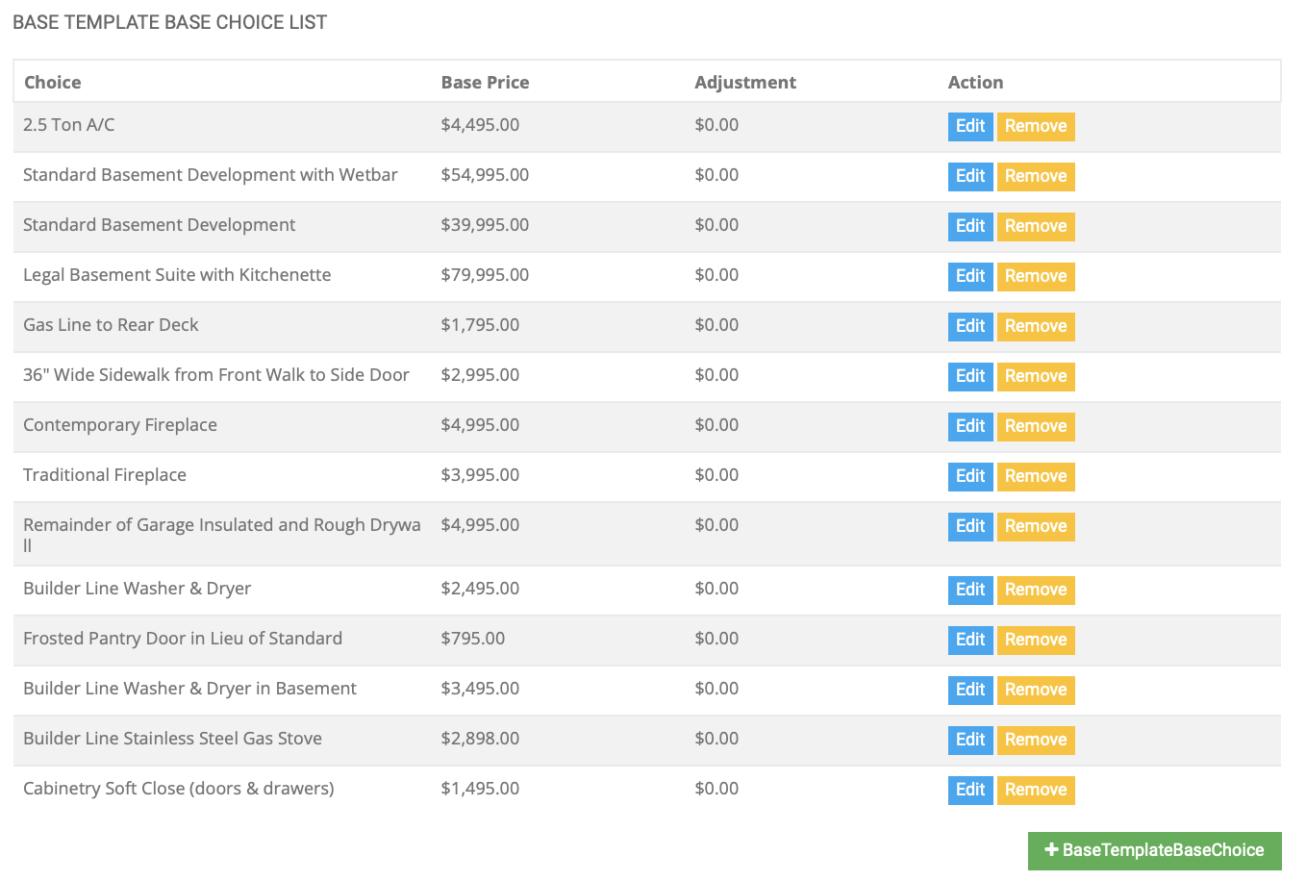
Update the Base Template Choice List (please refer to other guide on how to complete this)
These are the upgrades that pull into MRH as Standard Selection Upgrades when generating a contract.
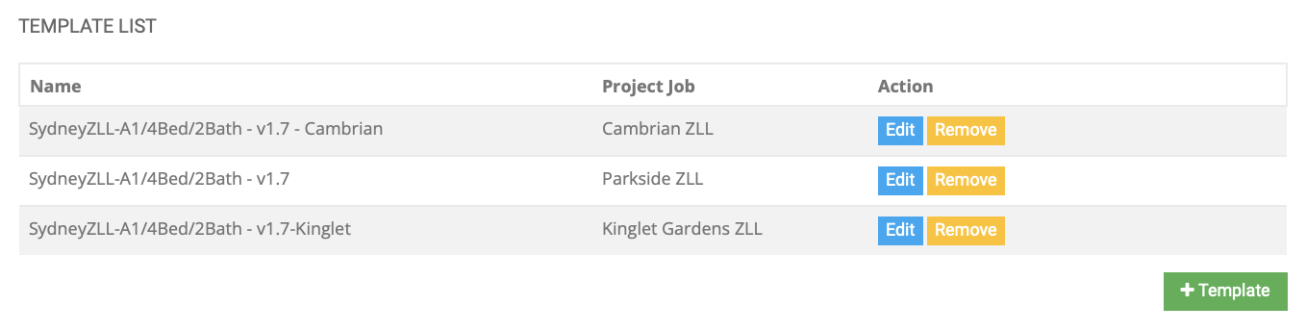
To update the template list in step one, we will select + Template.
If we are creating a new template, this section will be empty. If this template is for a new community that has not yet been configured as a region – that will need to be done prior.
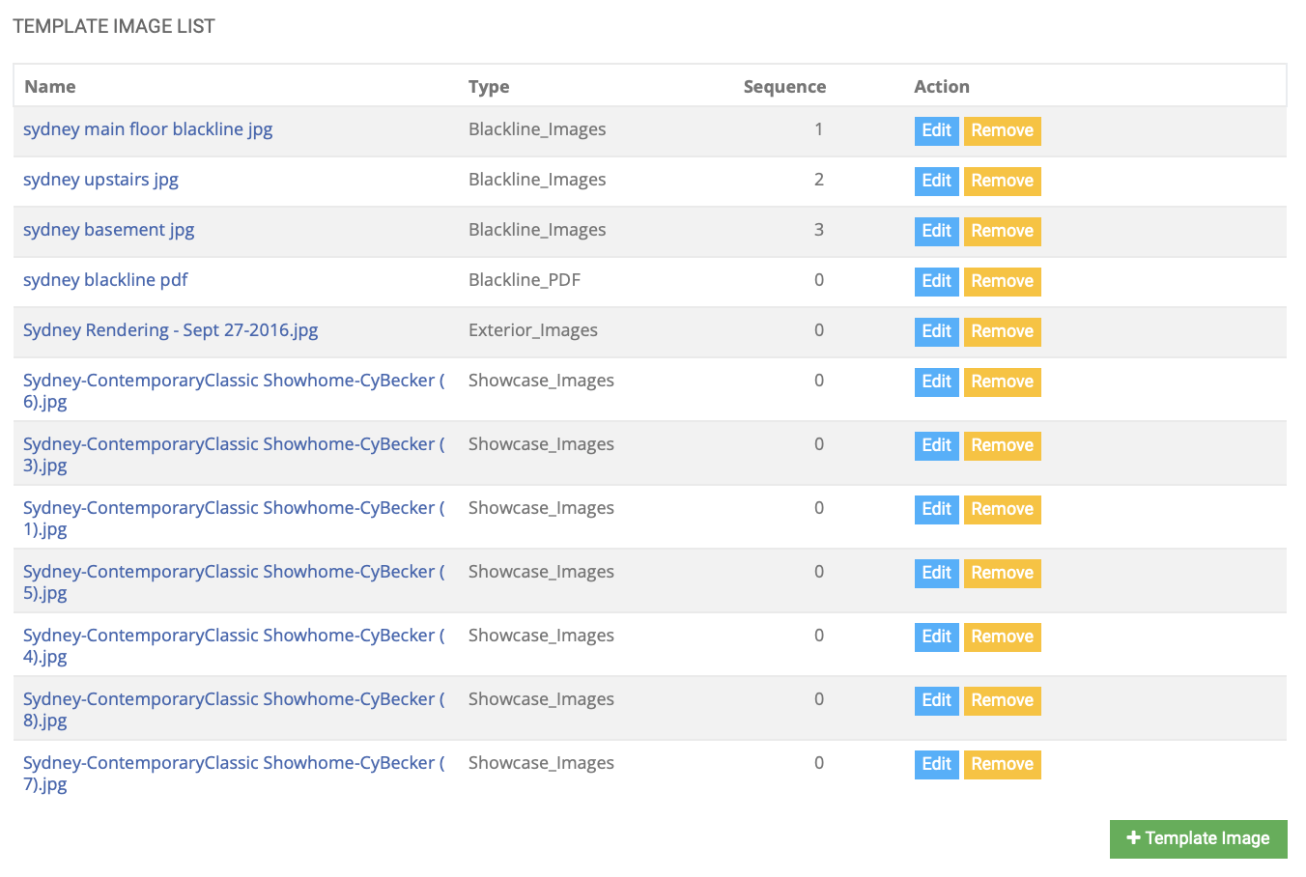
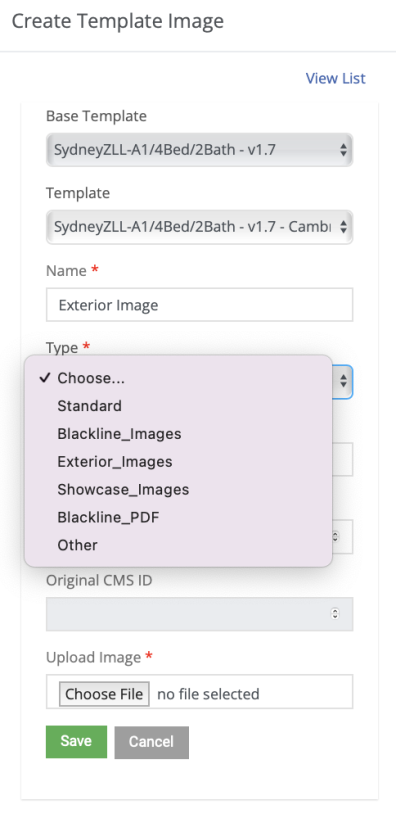
The template image list contains vital information that populates to the website, MRH and our contracts (Blacklines PDF). We need to ensure these images and PDF’s are correctly populated for all Base Templates. There is no need to complete this step at the
Project Template level – all PDFs and images pull directly FROM THE BASE TEMPLATE.
To add materials, select + Template Image:
You will need to populate the above information for each piece you are uploaded.
There should include:
- Shell Rendering at the Base Template Level (not unit for MF)
- Any other exterior images you would like to showcase at the shell level (Base Template).
- Blacklines PDF at the unit level Base Template. These pull through to all contracts.
- Blackline Images at the unit level Base Template. These pull through to the website and Sales App.
- Any showcase images (interior) you would like to include for unit, at the unit level Base Template. These pull through to the website and Sales App.
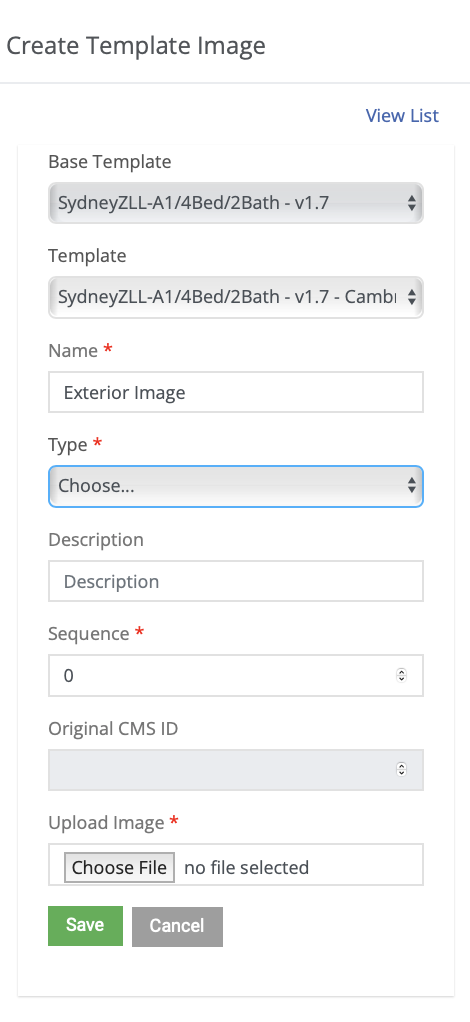
You must select the Base Template, the Project Template, Name your file, select the proper type, enter a description (lives in BB), and order the sequence how you would these to appear on the website / MRH. Then proceed to save the file. These must be done individually.
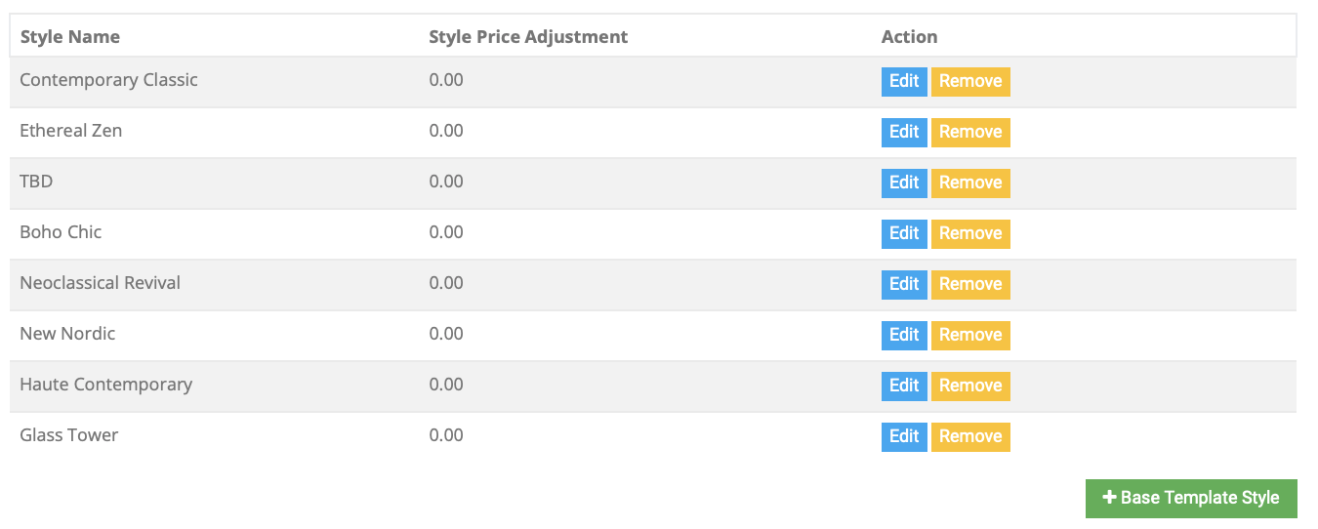
Additionally, you must apply base template style choices (interior design selection) to each of the base templates that act as a unit template. You can do so by selecting + Base Template Style and populating the following data and saving.
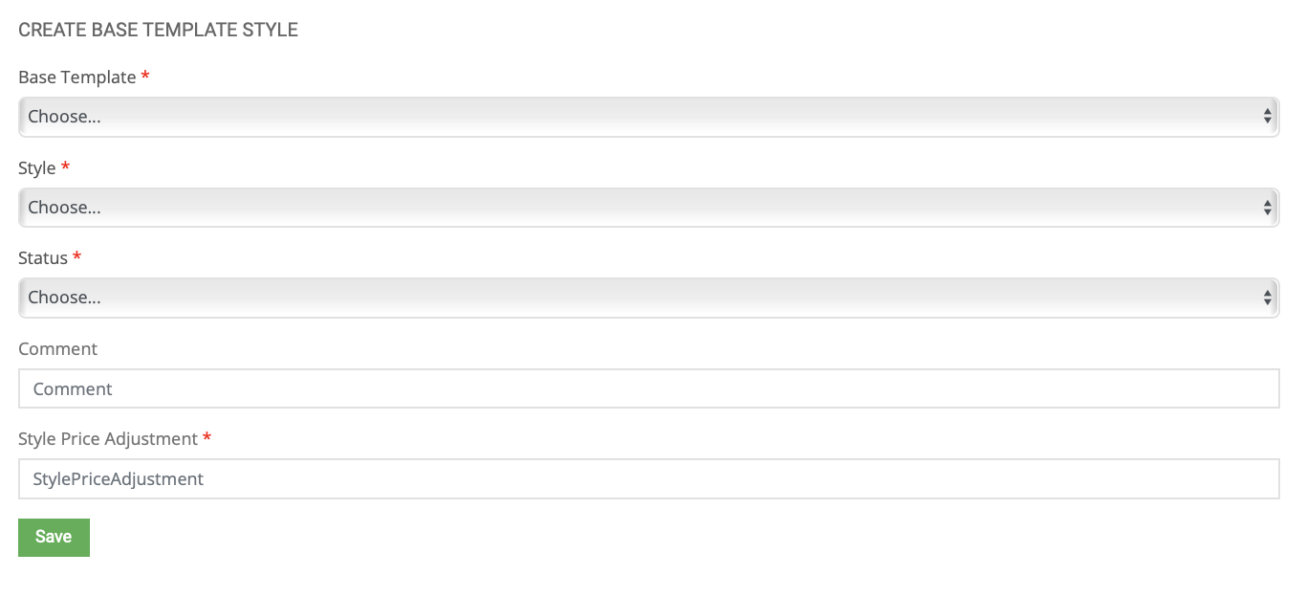
Configuration of new styles can be done within the Product Library section of BuildBase (refer to another tutorial document for this process).
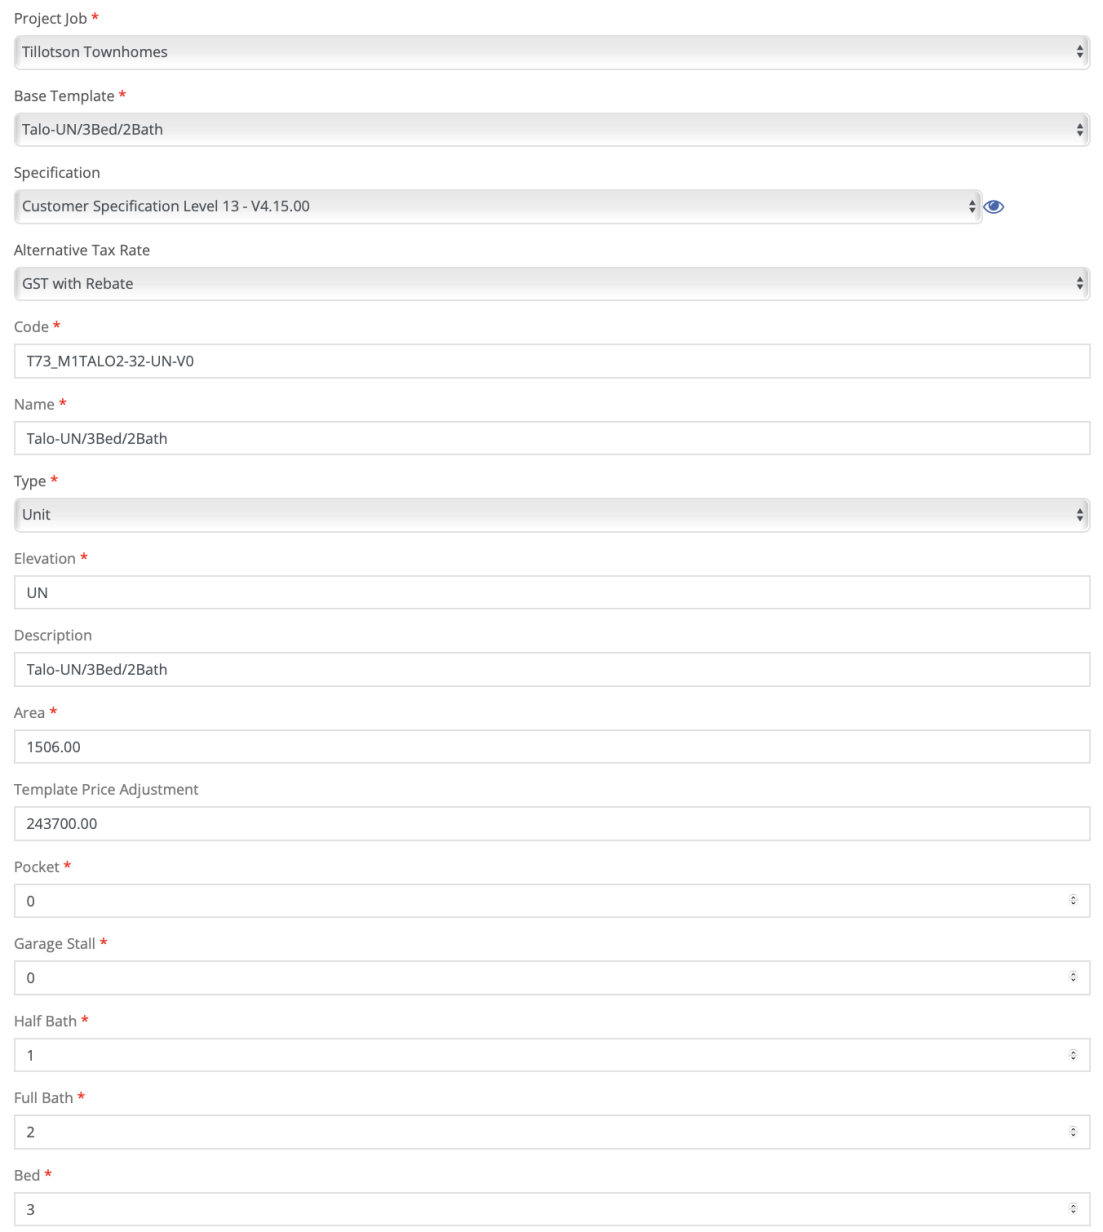
STEP 4 - Creating a Project Template
Navigate to the Project template section within the Sales Module Templates.

You will be prompted to fill out the data required to now create the Project Template. It is largely the same, with a few additions:
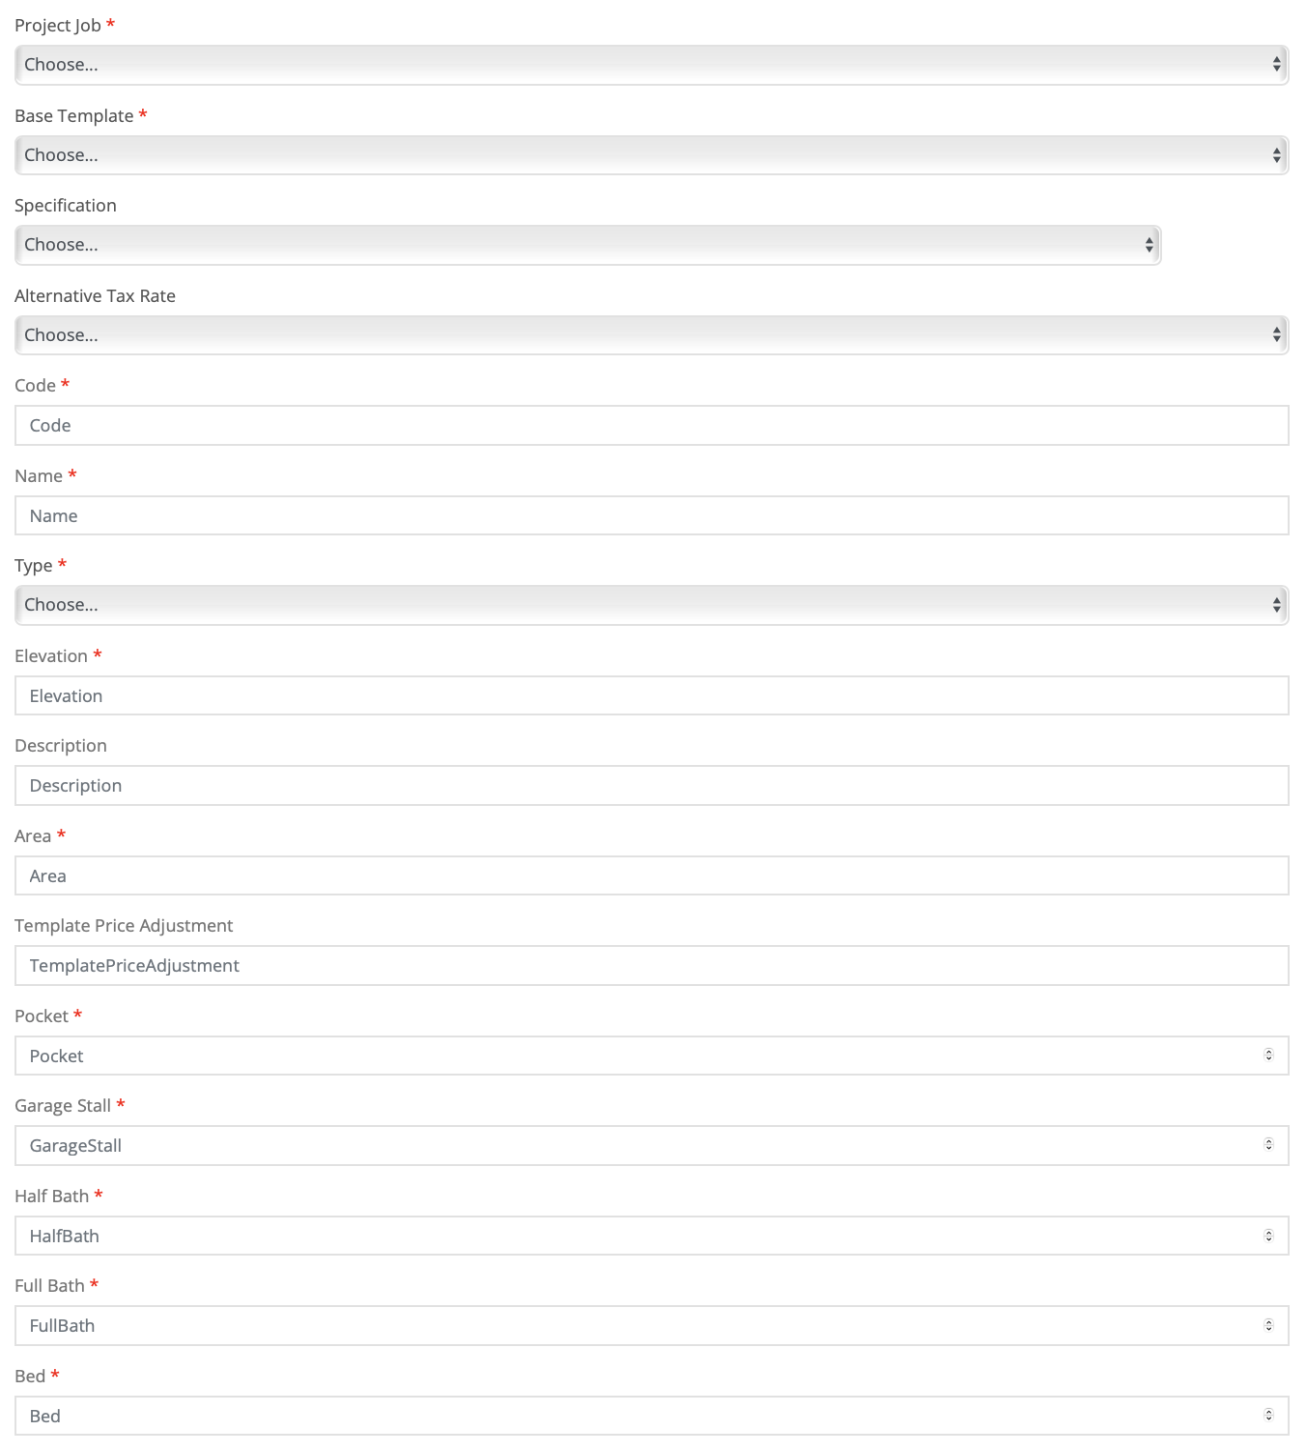
- Project Job: The sub-area you have configured or already exists that this project
- template will exist under.
- Base Template: The base template we have created that you are creating a sibling
- project template for.
- Specification: This is the specification level for the unit for the given region (ex. Level 2, Level 15, etc.)
- Alternative Tax Rate: Select the alternative tax rate the applies to this template if required.
- Code: Find from procurement or production
- Name: This is the specific naming schema from procurement or production.
- Type: The type of template.
- You will use Building, Unit or Both.
- Building: This is the template for a MF Shell
- Unit: This is the template for the unit inside the MF shell
- Both: This is the template for a SF unit.
- You will use Building, Unit or Both.
- Elevation: The elevation, if applicable.
- Could be A,B, B1, C etc. for SF.
- For MF unit template – enter ‘UN’.
- Description: This should be the name.
- Area: The square footage of the building, or unit. Can find this on the construction base drawings.
- Template Price: Ignore (enter $0).
- Pocket: The pocket size applicable.
- Garage stall: How many garage stalls? Enter the integer value.
- Half Bath: How many half baths? Enter the integer value.
- Full Bath: How many full baths? Enter the integer value.
- Bed: How many bedrooms? Enter the integer value.
- Virtual Tour URL: If you / marketing has a virtual tour URL for the template, this is where it gets entered.
- Discontinued checkbox: Leave unchecked
- Sellable checkbox: Mark as checked if you want to sell this template.
- Is Active Checkbox: Mark as checked if you want this template to be active and applicable.
An example of a populated template looks like the following:
The only other requirement for the project template, is to upload / assign it to the required projects and apply the relevant specifications to the template.
You are able to upload the specifications to the template in the Template Specifications
List:

Configuration of different specification levels are done in the Specifications section of the Sales Configuration model.