Classification Codes

Classification Codes are used as a way to classify building elements, systems, and assemblies. Additional terms used to describe these would be “Cost Types” or “Cost Codes”.
Classification Codes are the fixed set of codes used for managing, tracking, and reporting all costs, quantities, and profits associated with a particular project. Cost codes are used to simplify project data management across all levels of a job
To put it in simpler terms, these help us classify all the things we purchase to build a home. These Classification Codes help us categorize these items in a manner that makes it much easier for accounting, reporting, tracking, etc.
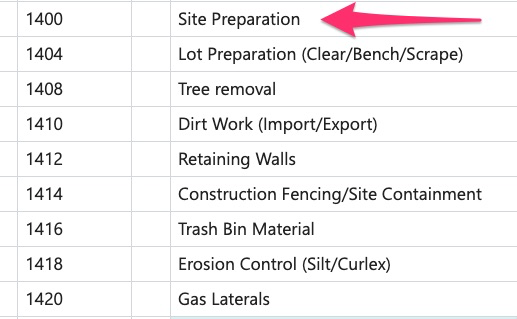
Here are some examples of Uniformat/Classification Codes:
- 2502 Frame Materials
- 2503 Beams/LVLs
- 2504 Roof Trusses
- 2505 Floor Trusses
- 3101 Drywall Material
- 3102 Drywall Labor
As you can see above, the use of Classification Codes help when viewing budgets as they places our costs in easy to view categories.
How are Classification Codes used in BuildBase?
- Item and Vendor Assignment
- Purchase Order/Payment Assignment
How do I know what my Classification Codes should be?
- First, we need to review your current structure
- Next, we need to review your accounting practices
- Lastly, we need to review your items
These things will help us to better understand the needs of your organization.
It is important to understand that Uniformat/Classification Codes in BuildBase might function differently than in your previous system. For example, in BuildBase:
- We do NOT build take offs in layers by cost type
- We DO assign cost types to items
- We DO assign items to Vendors by project
So, there is no need to create (00) “parent cost types like this:
Instead, we must consider Classification Codes at the item level and think of them in terms of how we will assign each individual item to a cost type.
Before creation of Classification Codes, it is extremely important that you first understand the impact they have on assemblies and how items are assigned to purchase orders. Please see full guide on “Items” to learn more, here is an excerpt.
How Uniformat/Classification Codes Impact Item PO Assignment
Vendors are issued purchase orders for the goods and services they provide. However, in most cases vendors will likely receive more than 1 purchase order per job depending on the items they provide. This is due to the way in which the system groups items to show on a purchase order.
When the system looks at items to determine the purchase orders it needs to create:
- It first looks to see if the item is in an assembly
- Then the vendor assigned to the item
- And finally, it looks at the Classification Codes of each individual item
When an assembly item (folder) is created, it should NOT have a Classification Code assigned. The system ignores these and instead looks at the items within the assembly. However, the description of the item assembly is important as this DOES appear on the PO.
Think of assemblies as a “Takeoff layer/junction” or a folder that simply houses items you want to be in the same package. Examples of this might be lumber, appliances, etc. But keep in mind, for the items in an assembly to appear on the same purchase order, they must ALL have the same Classification Code.
Let’s walk through some examples to better illustrate how it works.
For example, these items assigned to a vendor on a job all have the same Uniformat/Classification Code and are NOT in an assembly:
A - Uniformat/Classification Code 2502
B - Uniformat/Classification Code 2502
C - Uniformat/Classification Code 2502
D - Uniformat/Classification Code 2502
All 4 of these items will appear on 1 purchase order with Uniformat/Classification Code 2502 for this vendor.
However, if the items have the same Uniformat/Classification Code BUT are in different assembly BOMS:
A - BOM 1 (uniformat code 2502)
B - BOM 1 (uniformat code 2502)
C - BOM 1 (uniformat code 2502)
D - BOM 2 (uniformat code 2502)
The system will create 2 purchase orders:
1 PO will have items A, B, C with uniformat 2502
1 PO will have item D, with uniformat code 2502
Even though all items have the same uniformat, they will appear on separate POs due to the assembly BOM to which they are assigned.
As takeoffs become more complex, we may see an example like this:
A - BOM 1 (uniformat code 2504)
B - BOM 1 (uniformat code 2504)
C - BOM 1 (uniformat code 2502)
D - BOM 2 (uniformat code 2504)
The system would create 3 purchase orders in this scenario:
1 PO will have items A, B with uniformat 2504
1 PO will have item C with uniformat code 2502
1 PO will have item D with uniformat code 2504
In our last example, we now have 2 purchase orders for cost type 2504. But, if we have 10 more items assigned to a vendor on this job in uniformat code 2504 that are NOT in an assembly, the system will create an additional PO to house these, giving us a total of 3 POs for uniformat code 2504.
In some cases, it might not matter if items in an assembly appear on the same purchase order. For example, an option for a game room may have many items across many uniformat codes and impact multiple vendors. But, when dealing with assemblies like lumber packages where 1 vendor is supplying all and we need all the items delivered at the same time, we do want them on 1 purchase order.
It is extremely important that we understand this concept and keep it in mind as we create our uniformat codes and build our takeoff assemblies. For example, let’s say that your organization performs conventional stick framing and currently has 2 frame drops (deliveries).
Frame package 1
Frame package 2
Frame Package 1 may include items like:
- 2x4 treated base plate
- 2x4 studs
- Thermo Ply
- OSB for bracing
Frame Package 2 may include items like:
- 2x4 studs
- OSB for roof decking
Because we want these items to be delivered at different times in the construction process, we want them to show up on 2 separate purchase orders.
We must also understand that our classification code needs to be meaningful as it applies to items. We must know this as we create our item catalog so that we can plan accordingly. If we look at our items again in both packages:
Frame Package 1 may include items like:
- 2x4 treated base plate
- 2x4 studs
- Thermo Ply
- OSB for bracing
Frame Package 2 may include items like:
- 2x4 studs
- OSB for roof decking
We can clearly see that these items overlap (same items in both), we just want them at different stages in the construction process.
Let’s say that your organization has decided to use uniformat code (2502 – Framing Material) for these items. Again, uniformat codes should be meaningful but don’t get too bogged down in the details. Remember, you may use item attributes to further distinguish between items within a code. For example - code 2502 - Framing
Material may include items like:
- 2x4 stud
- 2x4x16
- OSB
- Simpson H clips
- Trusses/LVLs
You can place these all in 1 code but also have attributes like:
- Dimensional Lumber
- Plywood
- Hardware/Brackets
- Truss/LVLs
Use of these attributes will still give you the ability to search and categorize items but will make assemblies and take
offs much easier if we have fewer codes to contend with.
Now, back to our example:
Frame Package 1
- 2x4 treated base plate - 2502
- 2x4 studs - 2502
- Thermo Ply - 2502
- OSB for bracing – 2502
Above, we have created an assembly “Frame Package 1” and assigned the items with code 2502.
We have now made it so that the above items will all be on the same purchase order since they are all in the same assembly AS well as have the same code.
We then do the same for package 2. We create an assembly called “Frame Package 2” and assign the desired items.
Frame Package 2
- 2x4 studs
- OSB for roof decking
These 2 items are also being used in frame package 1, and that is ok. We also know they have 2502 assigned, which is also fine. But since we have created a separate assembly, these items will show up on a second PO for 2502 with the assignment “Frame Package 2”.
But what do I mean when I refer to “assignment”? The PO will show the following:
Uniformat description at top, code and description at the bottom:
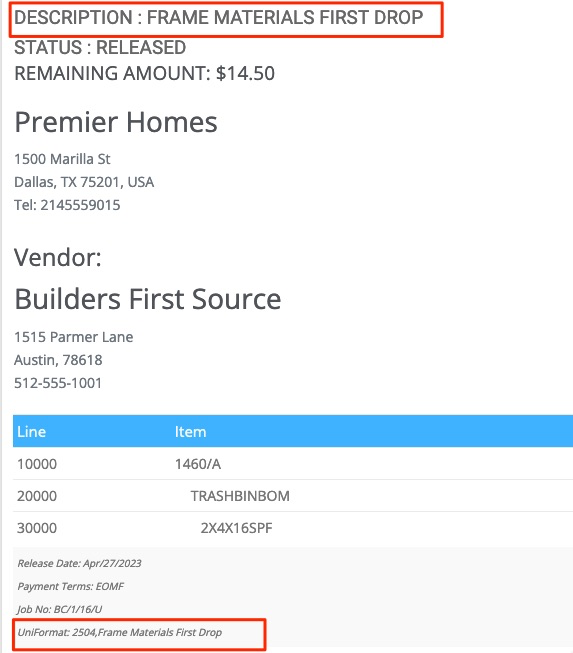
The PO will also show which assemblies the items came from:

So, using our example above, our first PO would look like this:
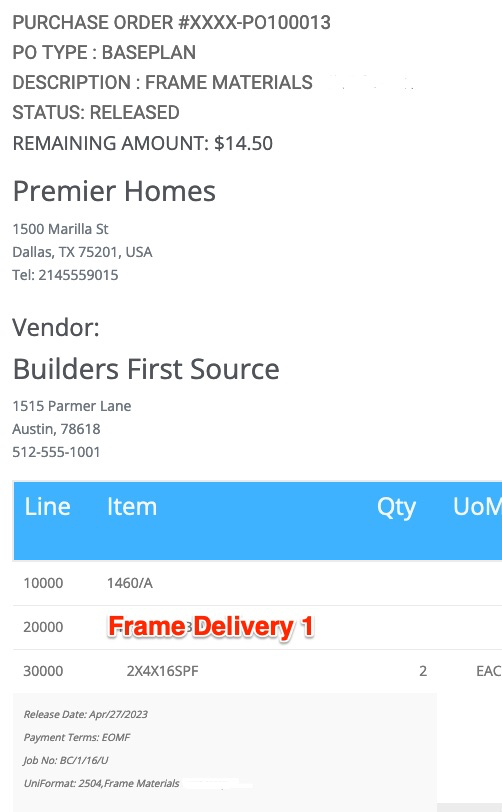
Code listed at top and bottom, and the assemblies 1460/A, and Frame Delivery 1 would appear. This is how the vendor will know what stage/part of the home the material is for. Notice that the “1460/A” is our parent assembly, and since Frame Delivery 1 is an assembly within the 1460/A assembly, they both show here.
This means is that IF we want a frame drop 1 and 2.
- We can use all the same items
- We can name our assemblies by frame drop 1 and 2 and the code will appear at the top/bottom.
- The name of the assembly “Frame Delivery 1” will also appear on the PO.
Knowing how the codes impact items and how they appear on a PO will now enable you to create codes that will help you reach your desired goal. Here are some helpful tips:
- Think broad and avoid making codes too specific remember, attributes is a great tool for specificity
- Plan out how you will build takeoffs
- Identify specific assemblies in which you DO want all items to appear on the same PO
If you have further questions, reach out to the BuildBase Team.
Creation of Uniformat Codes
Uniformat codes may be created in BuildBase as well as in Dynamics. However, if a new cost type is created in one system, it does NOT automatically flow to the other and will need to be added by the user to ensure the code exist in both systems.
If you are a new client in BuildBase, the implementation team will provide you with an import sheet to which the desired codes may be added. The BuildBase Team will then import all new codes to both BuildBase and Dynamics.
Uniformat Codes in BuildBase
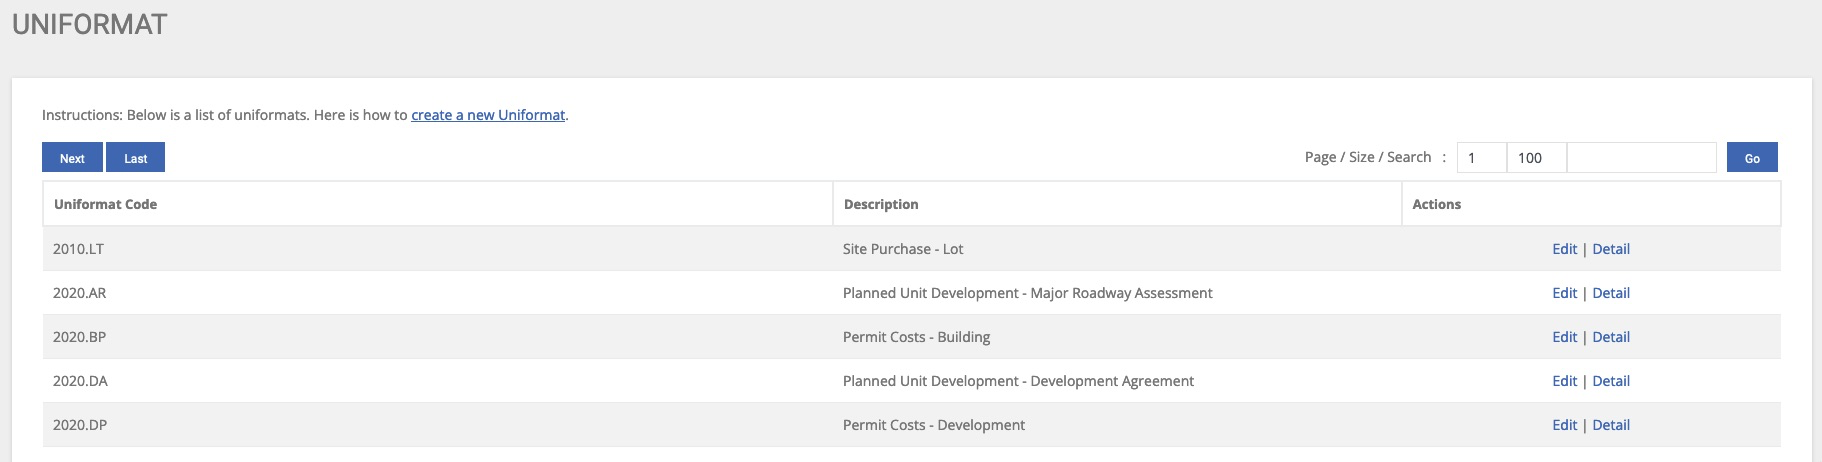
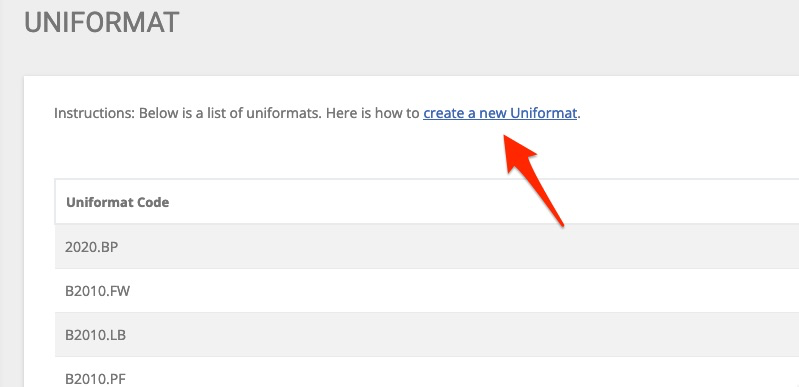
The Uniformat menu in the administration module allows us to view all active codes in the system:
To create a new cost type, click here:
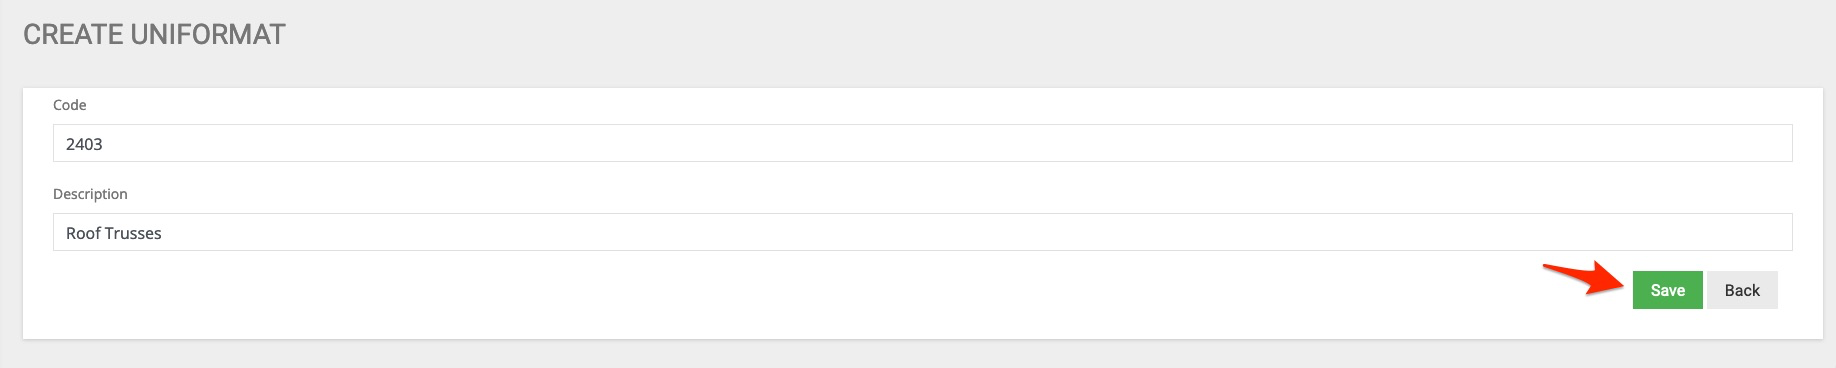
Then, simply type in the code and the description.
Remember our example above.
2403 (Roof Trusses)
2405 (Floor Trusses)
We now see our new code:

Codes in Dynamics
Codes are assigned to each item and will follow the item throughout the system as see here:

Codes in Dynamics are created through dimensions:
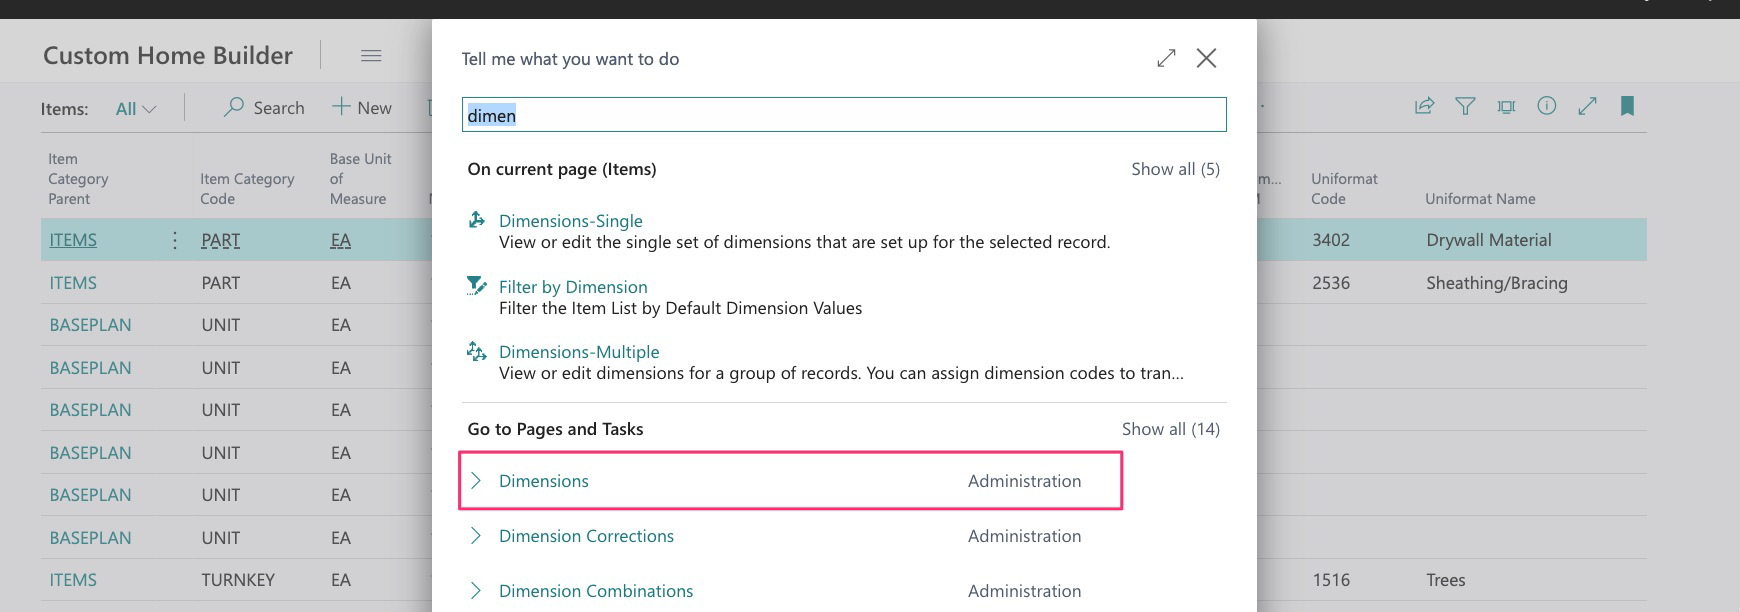
Using the search function, we have found Dimensions in Administration.
Here we see 3 different functions of dimensions with BuildBase and to see all current codes, select Classification Codes and then “Dimension Values”:
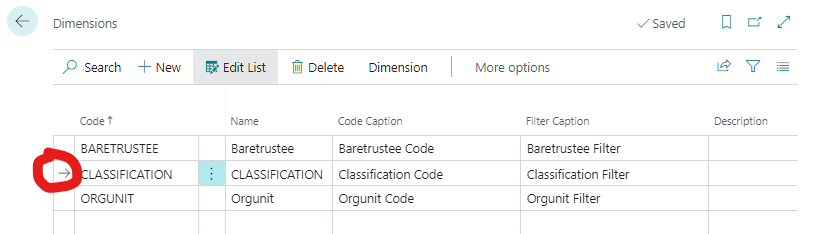
Here we find the full list of all the codes we have created:
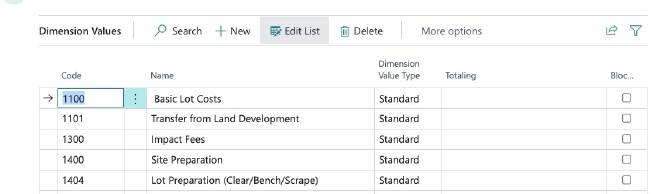
We can now modify, delete, and add new codes. Simply click “edit list”:

But, keep in mind that IF the code is assigned to any items,
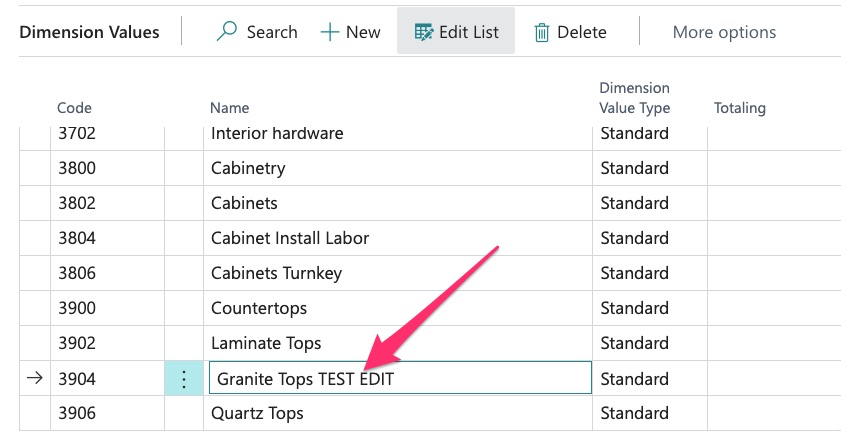
The code will be changed immediately on all items:

Assignment of uniformat codes to items
In order for an item to function properly, a code must be assigned. Although a code is not required at time of item creation, the item cannot be used in jobs, costed by vendor, etc., until a code is assigned.
Assigning a code to an item may be done singularly through the following steps.
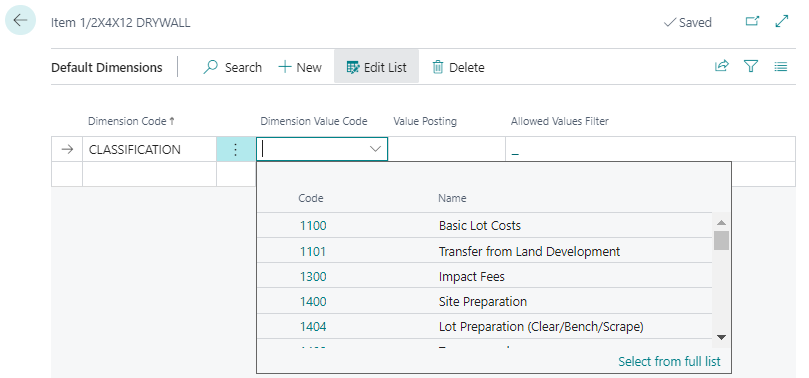
Select the item:

Then Related/Item/Dimensions:

Here we can then see all codes by scrolling, or select from a pop-up list:
We may also enter in partial or all of the description or code:
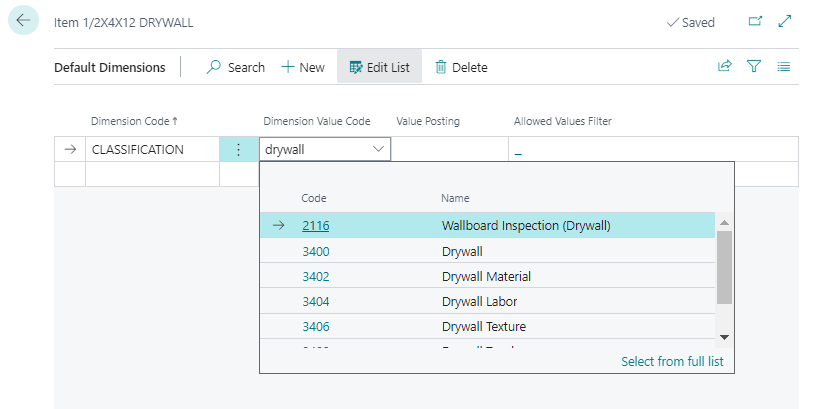
Then select the appropriate code and set the value posting to "Same Code"
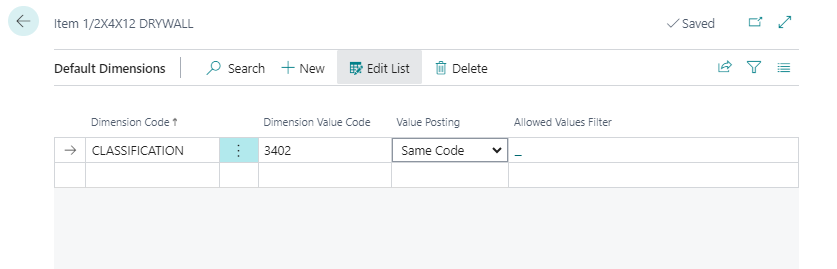
Once complete, simply use the arrows to back out of the item card and return to the item library:

We have now successfully added our code to this item:

Obviously, following this process for the entire item library would be extremely time consuming but fortunately, we can do this using a bulk tool, “Bulk Item Library Update”.
For more on how to assign codes in bulk, see guide on “Bulk Item Library Update”
Where Codes are Seen and How They can be Used:
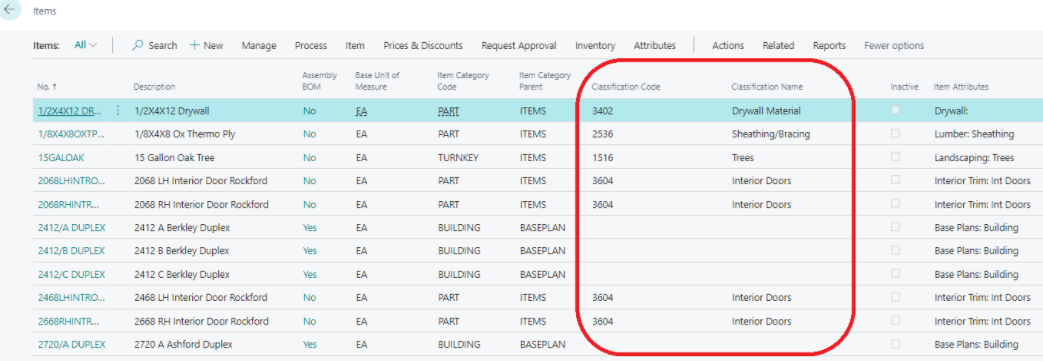
Once all items have been assigned a code, they will be seen in the item library:
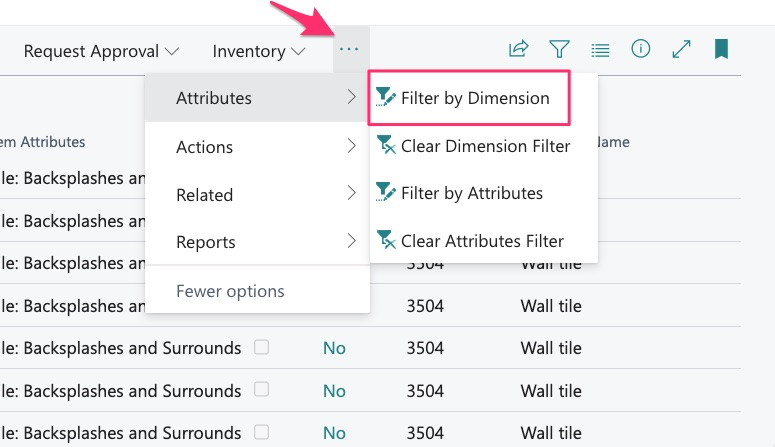
We can also use them as a parameter to filter our item library:
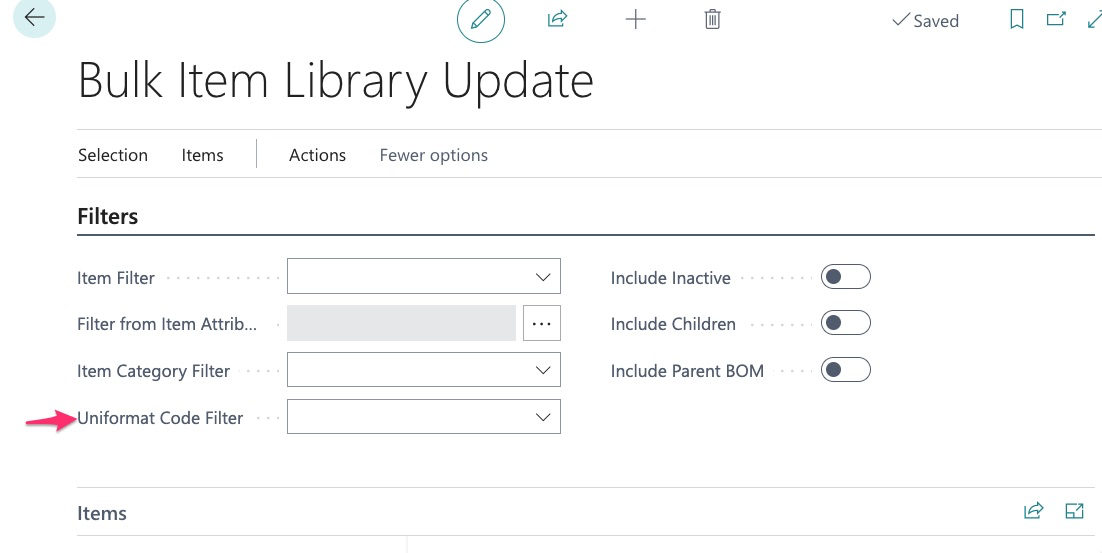
They may also be used as a filtering parameter in Bulk Tools like “Bulk Item Library Update”:
We hope you found this guide useful!