Introduction
Administration
Vendors & Partners
Purchase Order Views
Submitting an Invoice
Construct Schedule
Task Notes for Vendors
Payments/Remittance Advice
Vendor Export POS
Project Management
Purchasing and Estimating
Invoicing
Items
Introduction To Items
Navigating Items
When to Create a New Item
Unit of Measure
PO - BoM on Purchase Orders
Cost Model - Budgets
Bulk Item Creation and Modification Tools
Items FAQ
Attributes
Item Costing & Primary Vendors
Classification Codes
Creating Styles/Pallets/Storyboards
Jobs/Projects
Non-Job Purchase Orders
Construct
Introduction To Construct
Apply a Schedule - Prepare
Manage Construction Templates
Construction Dashboard
Delay Notes
Undo Task
Plan - Assign Start Date
Subtasks and Worksets
Task Notes
Sales
Sales Document Configuration
Sales Model Template Configuration
Sales Regions
Update Upgrade/Option Pricing
Docs
Introduction to Docs
Uploading a Document
Configuring Categories and Types
Bulk Permission Assignment
Reporting
Warranty
Introduction to Warranty
Accessing and Navigating the Warranty Module
Dashboards
Reviewing and Triaging Warranty Requests
Creating Warranty Requests
Find and Manage Warranty Jobs
Managing Warranty Requests
Managing Deficiencies and Work Orders
Closing Warranty Requests
Accounting
- All Categories
- Purchasing and Estimating
- Non-Job Purchase Orders
Non-Job Purchase Orders

Not all purchase orders are related to jobs, some purchase orders may be for head office and overhead expenses. These called Non-Job Purchase Orders.
Examples of non-job purchase orders
- Marketing Expenses
- Office Supplies
- Head Office Maintenance
- Technology Expenses
In order to create non-job purchase orders, please following the process below.
In Dynamics, click the search icon in top right corner, and go to the Purchase Orders list.

Click the New button in the menu.

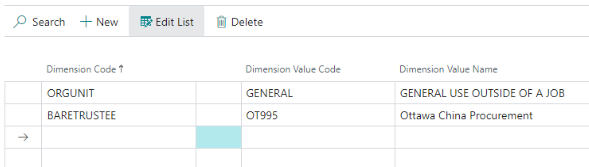
In the menu, click Related > Order > Dimensions

Specify a Dimension that are required to be filled in for your company. This typically includes ORG UNIT and BARETRUSTEE dimensions but may include other dimensions like division code. Then click the X or Close button to close the pop-up.
Type in the Vendor No.

Scroll down and fill in the purchase order details
- PO Type Code
- Lot Type Code
- Add in the items under the detail section. In this example, GL_LOGISTICS was added to the item grid. Fill out other necessary fields on the line item to specify quantity, price, etc.


Delete a Non-Jon Purchase Order
If you create a PO by accident that you want to abandon, just click the trash icon at the top center.
